AED 39.50
Description
The ESP8266 Wemos family with the Wemos D1 Mini Pro is a true professional among the ESP8266 modules. Building upon the foundation of the ESP8266EX, this iteration boasts an impressive 16MB of memory, a fourfold increase from its predecessor, the Wemos D1 Mini. Crafted for compactness, this new generation incorporates a ceramic antenna, providing an extended line-of-sight range of 90 meters. Noteworthy is the strategic placement of components on the top side of the module, eliminating the conventional heat sink found around the ESP8266 module. This alteration allows for a thicker board, enhancing durability and versatility. For those seeking even greater range, the board seamlessly integrates with the 2.4G Wireless SMA External Antenna included in the kit, amplifying the line-of-sight range to an impressive 150 meters—a 60-meter extension.
Features:
- Utilizes ESP8266EX with 16MB of memory.
- Compact design with a ceramic antenna for a 90m line-of-sight range.
- Top-side component soldering for a robust and versatile board.
- Compatibility with 2.4G Wireless SMA External Antenna for an extended range of 150m.
Specifications:
- CP2104 as a Serial converter.
- Consistent input/output configuration with 11 pins (including one analog input).
- Flash memory of 16MB (128 Mbit).
- IPEX connector for external WiFi antenna.
- Integrated ceramic antenna for enhanced performance.
- New CP2104 serial/USB converter.
- CPU frequency: 80 MHz / 160 MHz.
- Dimensions: 34.2 mm x 25.6 mm (thinner than the previous version).
- Weight: 2.5 g.
- External Antenna equipped with an SMA Connector.
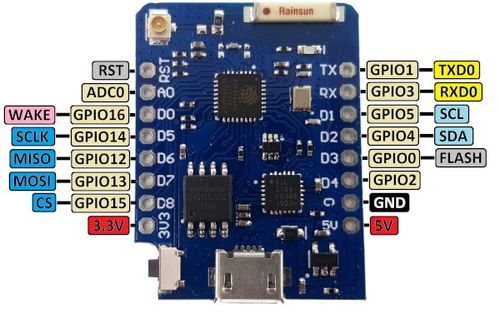
Pinout
| Pin | Function | GPIO | Notes |
|---|---|---|---|
| D0 | GPIO16 | 16 | Can be used for wake up from deep sleep (no interrupts) |
| D1 | GPIO5 | 5 | I2C SCL |
| D2 | GPIO4 | 4 | I2C SDA |
| D3 | GPIO0 | 0 | Connected to Flash button (pull-down for boot mode) |
| D4 | GPIO2 | 2 | Connected to built-in LED (active low) |
| D5 | GPIO14 | 14 | SPI SCK |
| D6 | GPIO12 | 12 | SPI MISO |
| D7 | GPIO13 | 13 | SPI MOSI |
| D8 | GPIO15 | 15 | SPI CS (Must be pulled low on boot) |
| TX | TXD | 1 | UART TX (debug output) |
| RX | RXD | 3 | UART RX (used for programming) |
| A0 | ADC0 | A0 | Analog input (0-1V) |
| 3V3 | 3.3V | - | 3.3V power output |
| GND | Ground | - | Ground |
| RST | Reset | - | Reset the microcontroller |
Additional Notes:
-
D0 (GPIO16): No interrupt capability.
- A0 (ADC0): The analog input pin can only read voltages from 0V to 1V. If higher voltages are input, a voltage divider is necessary.
- TX (TXD1): Used for serial debugging output.
- RX (RXD3): Used for serial communication and programming.
- D8 (GPIO15): Must be connected to ground during boot to enable the chip.

Step-by-step guide for first time:
1. Install Arduino IDE
- Download and Install: Get the Arduino IDE from arduino.cc.
- Launch the IDE: Open the Arduino IDE once installed.
2. Install ESP8266 Board Support
- Open Preferences:
- Go to
File>Preferences. - In the
Additional Board Manager URLsfield, paste the following URL:http://arduino.esp8266.com/stable/package_esp8266com_index.json - Click
OK.
- Go to
-
Install ESP8266 Package:
- Go to
Tools>Board>Boards Manager. - In the search bar, type “ESP8266” and install the
esp8266 by ESP8266 Communitypackage.
- Go to
3. Connect the Wemos D1 Mini Pro to Your Computer
- Use a Micro-USB cable to connect the board to your computer.
- Ensure the cable supports data transfer (not just charging).
4. Select the Board and Port
- Select Board:
- Go to
Tools>Board>ESP8266 Boardsand selectLOLIN(WEMOS) D1 mini Pro.
- Go to
- Select Port:
- Go to
Tools>Portand select the COM port that corresponds to your D1 Mini Pro.
- Go to
5. Upload a Test Sketch
- Open an Example Sketch:
- Go to
File>Examples>ESP8266>Blinkto open a simple LED blink example.
- Go to
Package includes:
- 1 x WEMOS D1 mini Pro-16 and
- 1 x Esp8266 series wifi wireless antenna
- 1 x Long female pins x2pcs
- 1 x Short female pins x2pcs
- 1 x Normal pins x2pcs