AED 91.35
Description
THE Great D1 R32 Mini board has a standard UNO size and connectors and based on the ESP-WROOM-32 Module. Powerful CPU with Xtensa® 32-bit LX6 Dual-core processor, up to 600 DMIPS,4 MByte SPI Flash , WiFi, Bluetooth with BLE technology and more.
The ESP-WROOM-32(ESP-32S) is a WiFi and Bluetooth module using the popular ESPRESSIF ESP32 chip.
The ESP32 chip integrates a dual-core processor with 448 KByte ROM, 520 KByte SRAM, 16 KByte SRAM in RTC, 802.11 b/g/n/e/I Wi-Fi, Bluetooth v4.2 BR/EDR & BLE, clocks & Times, abundant peripheral Interfaces and security mechanism.
The software can be developed using many different platforms, including Arduino. It is designed for Generic low power IoT sensor hub, loggers, video steaming for camera, Wi-Fi & Bluetooth enabled devices, Home automation, and mesh network applications, aimed at makers, hardware engineers, software engineers and solution provides.
The ESP32 is the most integrated solution for Wi-Fi + Bluetooth applications in the industry, ESP32 integrates the antenna switch, RF balun, power amplifier, low noise receive amplifier, filters, and power management modules. As such, the Chip itself occupies minimal Printed Circuit Board (PCB) area.
. Note: all I/O pins are 3.3V!
NOTE! Do NOT use with 5V shields! It can permanently damage the board! Use only with 3.3V shields and modules.
Features
- Standard UNO size and headers
- CPU and Memory: Xtensa® 32-bit LX6 Dual-core processor, up to 600 DMIPS
- 4 MByte SPI Flash
- 448 KByte ROM
- 520 KByte SRAM
- Compact size of 68mm x 53mm x 3.1mm (±0.2mm)
- Supply Voltage: DC 5V to 12V
WiFi
- 802.11 b/g/n/e/i
- 802.11 n (2.4 GHz), up to 150 Mbps
- 802.11 e: QoS for wireless multimedia technology.
- WMM-PS, UAPSD
- MPDU and A-MSDU aggregation
- Block ACK
- Fragmentation and Defragmentation
- Automatic Beacon monitoring/scanning
- 802.11 i security features: pre-authentication and TSN
- Wi-Fi Protected Access (WPA)/WPA2/WPA2-Enterprise/Wi-Fi Protected Setup (WPS)
- Infrastructure BSS Station mode/SoftAP mode
- Wi-Fi Direct (P2P), P2P Discovery, P2P Group Owner mode and P2P Power Management
- UMA compliant and certified
- Antenna diversity and selection
Bluetooth
- Compliant with Bluetooth v4.2 BR/EDR and BLE specification
- Class-1, class-2 and class-3 transmitter without external power amplifier
- Enhanced power control
- +10 dBm transmitting power
- NZIF receiver with -98 dBm sensitivity
- Adaptive Frequency Hopping (AFH)
- Standard HCI based on SDIO/SPI/UART High-speed UART HCI, up to 4 Mbps
- BT 4.2 controller and host stack
- Service Discovery Protocol (SDP)
- General Access Profile (GAP)
- Security Manage Protocol (SMP)
- Bluetooth Low Energy (BLE)
- ATT/GATT
- HID
- All GATT-based profile supported
- SPP-Like GATT-based profile
- BLE Beacon
- A2DP/AVRCP/SPP, HSP/HFP, RFCOMM
- CVSD and SBC for audio codec
- Bluetooth Piconet and Scatternet
Package Includes
1 x ESP32 Uno board
How to start with Esp32 ch340 Wemos D1 R32 Mini Wifi Bluetooth Development Board Tutorial:
1.) Before we plug into the Wemos R32 board, we need to install Arduino first. Get the Arduino from this link: https://www.arduino.cc/en/Guide/HomePage
2.) Afterward, open the Arduino and obtain the ESP32 support first:
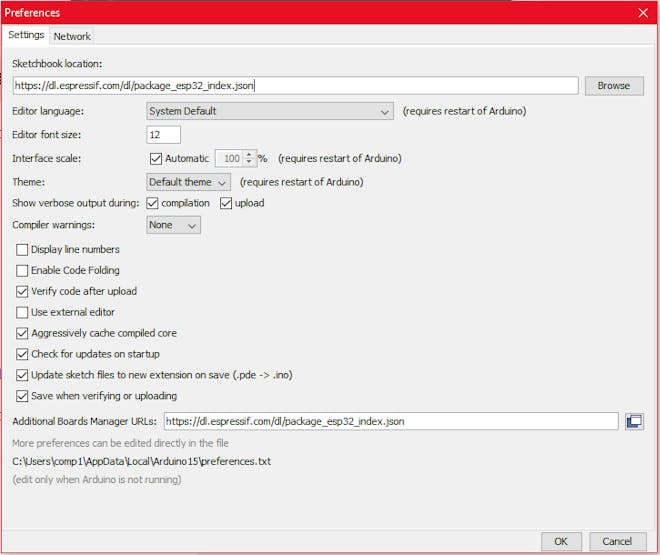
Select File -> Preferences, and then copy this link (https://dl.espressif.com/dl/package_esp32_index.json) into the Additional Boards Manager URLs:
3.) Go to Tools -> Board -> Boards Manager, then type in "ESP32". When you see this, press Install:

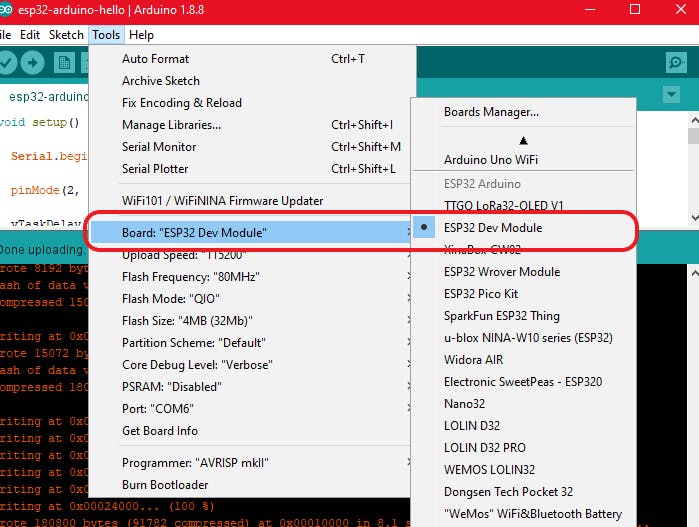
4.) Once it's all done, go to Tools -> Board -> Boards Manager, and then select "ESP32 Dev Module":
5.) Create a new project! Type this in:
void setup() {
 Serial.begin(112500);
 pinMode(2, OUTPUT);
 vTaskDelay(1000 / portTICK_PERIOD_MS);
 xTaskCreate(task1,"task1", 2048, NULL,1,NULL);
 xTaskCreate(task2,"task2", 2048, NULL,1,NULL);
}
void loop() {
 vTaskDelay(1000 / portTICK_PERIOD_MS);
}
void task1( void * parameter )
{
 while(1) {
 Serial.println("Hello World!");
 vTaskDelay(1000 / portTICK_PERIOD_MS);
 }
}
void task2( void * parameter)
{
 while(1) {
 digitalWrite(2, HIGH);
 vTaskDelay(500 / portTICK_PERIOD_MS);
 digitalWrite(2, LOW);
 vTaskDelay(500 / portTICK_PERIOD_MS);
 }
}
6.) Save the project.
7.) Before you upload, connect the R32 board to your PC. Find the COM port that is with the R32 board through Device Manager. The board is equipped with the CH340, so take note of the COM number:
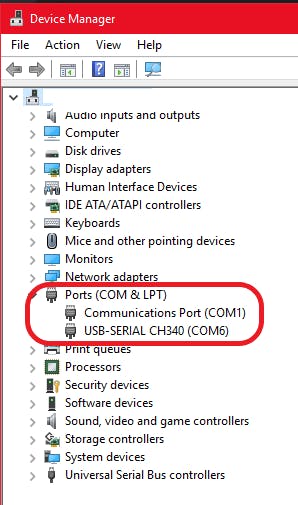
In this example it's COM6, so it will be different on your PC.
Note: If you couldn't find this "USB-SERIAL CH340", the drivers are probably not installed. You can refer to the CH340 driver's installation guide here: https://sparks.gogo.co.nz/ch340.html
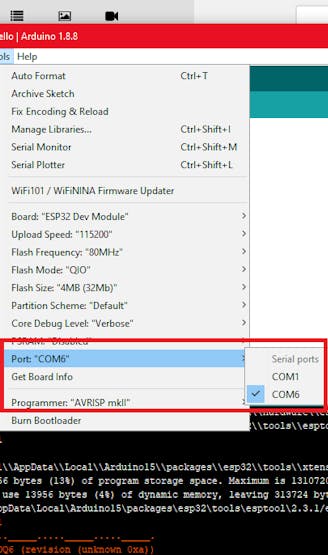
8.) Back to your Arduino, select your COM port that is connected to the board:
9.) Press "Upload".
When you see the "Connecting...", press the Reset button for about 4 seconds, and then release it:

You will see a lot of messages scrolling downwards. It is in the process of uploading the binary to the ESP32 module on the board.
Chip is ESP32D0WDQ6 (revision (unknown 0xa))
Features: WiFi, BT, Dual Core, VRef calibration in efuse
Uploading stub...
Running stub...
Stub running...
Configuring flash size...
Auto-detected Flash size: 4MB
Compressed 8192 bytes to 47...
Writing at 0x0000e000... (100 %)
Wrote 8192 bytes (47 compressed) at 0x0000e000 in 0.0 seconds (effective 3640.9 kbit/s)...
Hash of data verified.
Compressed 15072 bytes to 9733...
Writing at 0x00001000... (100 %)
Wrote 15072 bytes (9733 compressed) at 0x00001000 in 0.9 seconds (effective 139.2 kbit/s)...
Hash of data verified.
Compressed 180800 bytes to 91782...
Writing at 0x00010000... (16 %)
Writing at 0x00014000... (33 %)
Writing at 0x00018000... (50 %)
Writing at 0x0001c000... (66 %)
Writing at 0x00020000... (83 %)
Writing at 0x00024000... (100 %)
Wrote 180800 bytes (91782 compressed) at 0x00010000 in 8.1 seconds (effective 178.3 kbit/s)...
Hash of data verified.
Compressed 3072 bytes to 144...
Writing at 0x00008000... (100 %)
Wrote 3072 bytes (144 compressed) at 0x00008000 in 0.0 seconds (effective 910.2 kbit/s)...
Hash of data verified.
Leaving...
Hard resetting via RTS pin...
The upload is successful when it says : "Hash of data verified. Leaving..." at the end of the process.
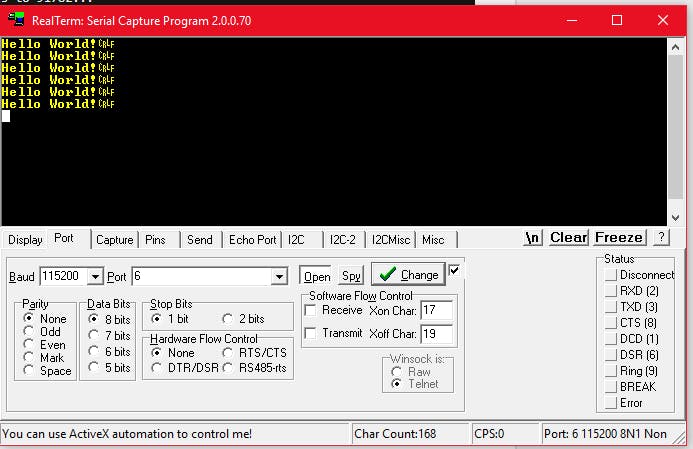
10.) Open a terminal program or serial monitor on arduino IDE and you will see "Hello World!" printed on it each second, and the LED on the board toggles at the rate of 500ms:
You are done here!