AED 29.00
Description
The Wemos D1 Mini V3.0.0 WiFi Development Board is a compact and versatile microcontroller board based on the ESP8266 chipset. It has built-in WiFi connectivity, which allows it to connect to the internet and interact with other devices. The board features a powerful 80 MHz microcontroller, 4MB of flash memory, and a variety of I/O pins for interfacing with sensors, actuators, and other devices. It can be programmed using the Arduino IDE and is compatible with many existing Arduino libraries and sketches. The board is designed to be easy to use and is ideal for a wide range of DIY projects, including home automation, robotics, and IoT applications.
Package Includes:
- 1 x Wemos D1 Mini V3.0.0 WiFi Development Board
- 2x Long female pins
- 2x Short female pins
- 2x Normal pins
Features:
- ESP8266 chipset: The board is based on the popular ESP8266 chipset, which provides built-in WiFi connectivity and makes it easy to connect the board to the internet and other devices.
- Compact size: The board is very compact, measuring just 34.2mm x 25.6mm, which makes it easy to integrate into small projects and devices.
- Powerful microcontroller: The board features an 80 MHz microcontroller with 4MB of flash memory, which provides plenty of processing power and storage for a wide range of projects.
- Multiple I/O pins: The board has a variety of I/O pins, including GPIO, I2C, SPI, and UART, which allow it to interface with a wide range of sensors, actuators, and other devices.
- Arduino IDE compatibility: The board is compatible with the Arduino IDE, which means that it can be programmed using the familiar Arduino programming language and is compatible with many existing Arduino libraries and sketches.
- Pre-installed firmware: The board comes with a range of pre-installed firmware, including a web server, MQTT client, and support for OTA (Over-the-Air) updates.
- Easy to use: The board is designed to be easy to use, with a plug-and-play design that requires no additional components or soldering.
- Low power consumption: The board has low power consumption, making it ideal for battery-powered projects and devices.
Description:
The Wemos D1 Mini V3.0.0 WiFi Development Board is a compact and powerful microcontroller board that is designed for building IoT projects and smart devices. It is based on the popular ESP8266 chipset, which provides built-in WiFi connectivity and makes it easy to connect the board to the internet and other devices. The board features an 80 MHz microcontroller with 4MB of flash memory, which provides plenty of processing power and storage for a wide range of projects. It also has a variety of I/O pins, including GPIO, I2C, SPI, and UART, which allow it to interface with a wide range of sensors, actuators, and other devices. One of the key advantages of the Wemos D1 Mini V3.0.0 is its compatibility with the Arduino IDE. This means that it can be programmed using the familiar Arduino programming language and is compatible with many existing Arduino libraries and sketches. This makes it easy for beginners and experienced developers to get started with the board and create a wide range of projects. the Wemos D1 Mini V3.0.0 also comes with a range of pre-installed firmware, including a web server, MQTT client, and support for OTA (Over-the-Air) updates. This makes it easy to build projects that can be controlled and monitored over the internet and allows for easy updates and maintenance.
Principle of Work:
The Wemos D1 Mini V3.0.0 WiFi Development Board is a microcontroller board that works by running code on its 80 MHz microcontroller, which is based on the ESP8266 chipset. The microcontroller is programmed using the Arduino IDE, which allows users to write code using the familiar Arduino programming language. The board has multiple input/output (I/O) pins, including GPIO, I2C, SPI, and UART, which can be used to interface with a wide range of sensors, actuators, and other devices. For example, you can connect a temperature sensor to one of the I/O pins and then write code that reads the temperature and sends it to a web server over the built-in WiFi connection. To use the board, you will typically start by connecting it to your computer using a USB cable. You can then open the Arduino IDE and write code that controls the various inputs and outputs on the board. Once you have written your code, you can upload it to the board using the USB connection. In addition to its programming versatility, the Wemos D1 Mini V3.0.0 is also designed to be low-power, making it ideal for battery-powered projects and devices. It has a sleep mode that can be used to conserve power when the board is not in use.
Pinout of the Module:
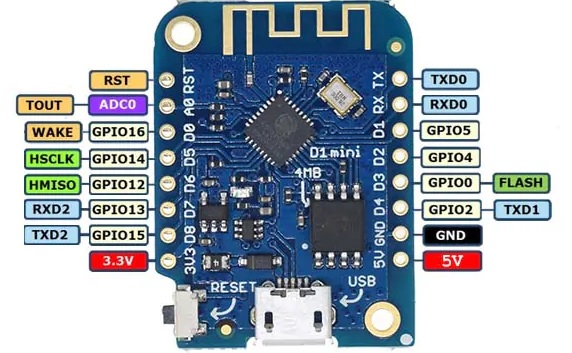
| Pin Name | Function |
|---|---|
| 5V | 5V power input |
| 3V3 | 3.3V power output |
| GND | Ground pin |
| A0 | Analog input |
| TX | Digital input/output, UART receive |
| RX | Digital input/output, UART transmit |
| D2 | Digital input/output, Interrupt, PWM |
| D3 | Digital input/output, PWM |
| D4 | Digital input/output, PWM |
| D5 | Digital input/output, PWM, SPI |
| D6 | Digital input/output, PWM, SPI |
| D7 | Digital input/output, PWM |
| D8 | Digital input/output, PWM, Interrupt |
Applications:
- Internet of Things (IoT) projects: The board has built-in Wi-Fi capabilities, making it ideal for projects that require connecting to the internet and communicating with other devices.
- Home automation: With its support for Wi-Fi and numerous digital and analog input/output pins, the board can be used to control and automate various home appliances and devices.
- Robotics: The board's small size, low power consumption, and support for various sensors and actuators make it suitable for use in robotics projects.
- Data logging and monitoring: The board can be used to monitor and log data from sensors and other devices, and transmit the data over Wi-Fi to a remote server or cloud service.
- Wearable technology: The small size and low power consumption of the board make it ideal for use in wearable technology projects, such as fitness trackers or smart watches.
Circuit:
We will not need any circuit we will use the built-in LED in our Example
Library:
- Install the Arduino IDE: Download and install the Arduino IDE from the official website: https://www.arduino.cc/en/software
- Install the Wemos D1 Mini board in Arduino IDE: Open the Arduino IDE and go to File > Preferences. In the Additional Boards Manager URLs field, enter the following URL: http://arduino.esp8266.com/stable/package_esp8266com_index.json. Click OK to save the changes.
- Install the ESP8266 board package: Go to Tools > Board > Boards Manager. In the Boards Manager window, search for "esp8266" and click Install. This will install the board package necessary for programming the Wemos D1 Mini.
- Select the board and port: Go to Tools > Board and select "WeMos D1 R2 & mini". Then, go to Tools > Port and select the COM port your Wemos D1 Mini is connected to.
- Upload the code: Now you can write your code in the Arduino IDE and upload it to the Wemos D1 Mini by clicking the "Upload" button. Make sure the correct board and port are selected before uploading the code.
- Verify the code: After the upload is complete, the code will start running on the Wemos D1 Mini board. You can verify that it's working correctly by checking the output on the serial monitor. Go to Tools > Serial Monitor to open the serial monitor window.
Code:
Example code to blink the built-in LED on the Wemos D1 Mini board in an uneven pattern:
int ledPin = LED_BUILTIN;

void setup() {
  pinMode(ledPin, OUTPUT);
}

void loop() {
  digitalWrite(ledPin, HIGH);
  delay(500);
  digitalWrite(ledPin, LOW);
  delay(100);
  digitalWrite(ledPin, HIGH);
  delay(200);
  digitalWrite(ledPin, LOW);
  delay(200);
  digitalWrite(ledPin, HIGH);
  delay(100);
  digitalWrite(ledPin, LOW);
  delay(500);
}
This code sets the ledPin variable to the built-in LED pin on the Wemos D1 Mini board. In the setup() function, it sets the ledPin as an output pin. In the loop() function, it blinks the LED in an uneven pattern using a series of digitalWrite() and delay() commands. You can adjust the delay times to create different blinking patterns.
Technical Details:
| Microcontroller | ESP-8266EX |
| Operating voltage | 3.3V |
| Input voltage (USB) | 5V |
| Digital I / O pins | 11 |
| Analog input pins | 1 (Max input: 3.2V) |
| Flash memory | 4M bytes |
| Clock speed | 80MHz / 160MHz |
| CPU | 32-bit |
| length | 34.2mm |
| broad | 25.6mm |
| Weight | 3g |
Resources:
Comparison:
The Wemos D1 Mini V3.0.0 and the original Wemos D1 Mini are both development boards based on the ESP8266 Wi-Fi module and are compatible with the Arduino IDE. However, there are some differences between them:
- Size: The Wemos D1 Mini V3.0.0 is slightly smaller in size compared to the original Wemos D1 Mini, which makes it more compact and suitable for projects where space is limited.
- Pinout: The pinout of the Wemos D1 Mini V3.0.0 is slightly different from the original Wemos D1 Mini, although they both have 11 digital input/output pins. The Wemos D1 Mini V3.0.0 has D1 and D2 pins for I2C communication, while the original Wemos D1 Mini has SDA and SCL pins for I2C communication.
- Power supply: The Wemos D1 Mini V3.0.0 can be powered through a micro USB port, while the original Wemos D1 Mini can be powered through a micro USB port or an external power supply.
- Wi-Fi antenna: The Wemos D1 Mini V3.0.0 has an on-board ceramic Wi-Fi antenna, while the original Wemos D1 Mini has an external antenna connector for an optional antenna.
- Flash memory: The Wemos D1 Mini V3.0.0 has 4MB of flash memory, while the original Wemos D1 Mini has 1MB of flash memory.
The Wemos D1 Mini V3.0.0 and the original Wemos D1 Mini are both capable development boards with similar functionalities, but the Wemos D1 Mini V3.0.0 is more compact, has a different pinout, and has a built-in Wi-Fi antenna, while the original Wemos D1 Mini has more flash memory and an external antenna connector. The choice between the two depends on the specific project requirements and personal preferences.