AED 16.00
Description
A keypad membrane sealed 4x3 button is a type of input device that consists of a flat panel with buttons arranged in a 4x3 matrix. The buttons are made of a flexible, rubber-like material and have conductive contacts on their underside. When a button is pressed, it makes contact with a corresponding contact pad on the circuit board beneath the panel, sending an electrical signal to a microcontroller or other device. The membrane panel is typically sealed to protect it from moisture and debris, making it suitable for use in a wide range of environments.
Package Includes:
- 1 x Keypad Membrane Sealed 4X3 Button
Features:
- Matrix layout: The keypad has a 4x3 matrix layout, which means it has 12 buttons arranged in four rows and three columns.
- Membrane design: The buttons on the keypad are made of a flexible, rubber-like membrane material that is durable and can withstand repeated use.
- Sealed design: The membrane panel is sealed to protect it from moisture, dust, and other contaminants, making it suitable for use in harsh environments.
- Easy to clean: The sealed design also makes the keypad easy to clean, as you can wipe it down with a damp cloth without worrying about water damage.
- Low profile: The keypad has a low profile design, which means it takes up minimal space and can be easily mounted or integrated into other devices.
- Long lifespan: The membrane material used in the keypad has a long lifespan, making it a reliable and durable input device.
- Simple wiring: The keypad is easy to wire to other electronic devices, as each button is connected to a corresponding contact pad on a circuit board beneath the membrane panel.
- Cost-effective: Keypad membrane-sealed 4x3 buttons are generally cost-effective, making them a popular choice for a wide range of applications where simple and reliable input devices are needed.
Description:
A keypad membrane sealed 4x3 button is a type of input device that is commonly used in electronic devices such as calculators, remote controls, and security systems. The keypad consists of a flexible membrane panel with 12 buttons arranged in a 4x3 matrix pattern. The buttons are made of a flexible, rubber-like material and have conductive contacts on their underside. When a button is pressed, it makes contact with a corresponding contact pad on the circuit board beneath the membrane panel, sending an electrical signal to a microcontroller or other device. The membrane panel is typically sealed with a protective layer to protect it from moisture and debris, making it suitable for use in a wide range of environments. The sealed design of the keypad makes it easy to clean, as you can simply wipe it down with a damp cloth without worrying about water damage. This also makes it a popular choice for applications where cleanliness is important, such as medical devices and food processing equipment. Keypad membrane-sealed 4x3 buttons are generally cost-effective and have a long lifespan, making them a reliable and durable input device. They are also easy to wire to other electronic devices, as each button is connected to a corresponding contact pad on a circuit board beneath the membrane panel.
Principle of Work:
The principle of work for a keypad membrane-sealed 4x3 button is based on the concept of a switch matrix. Each button on the keypad is connected to a specific row and column in a grid or matrix pattern. When a button is pressed, it makes contact between the corresponding row and column lines in the matrix, completing a circuit and sending a signal to a microcontroller or other device. The keypad membrane is made of a thin, flexible layer of material with conductive traces printed on its surface. The conductive traces run in rows and columns beneath the keypad buttons. The underside of each button has a small, conductive pad that makes contact with the corresponding row and column traces when it is pressed. When a button is pressed, it compresses the flexible membrane and causes the conductive pad on the underside of the button to make contact with the conductive traces on the membrane beneath it. This creates a short circuit between the corresponding row and column traces, which is detected by the microcontroller or another device connected to the keypad. The microcontroller or other device reads the signals from the keypad and determines which button was pressed based on the row and column combination that was shorted together. The device can then take appropriate action based on the button press, such as displaying a number on a screen or performing a specific function.
Pinout of the Module:
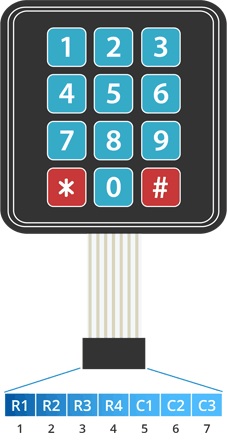
- Row 1: This pin is connected to the first row of the keypad matrix.
- Row 2: This pin is connected to the second row of the keypad matrix.
- Row 3: This pin is connected to the third row of the keypad matrix.
- Row 4: This pin is connected to the fourth row of the keypad matrix.
- Column 1: This pin is connected to the first column of the keypad matrix.
- Column 2: This pin is connected to the second column of the keypad matrix.
- Column 3: This pin is connected to the third column of the keypad matrix.
Applications:
- Calculators: Keypad membrane sealed 4x3 buttons are commonly used in calculators, where they provide a simple and cost-effective input method for entering numerical values and performing calculations.
- Remote controls: Many remote controls for electronic devices such as televisions and DVD players use keypad membrane sealed 4x3 buttons to provide a compact and reliable input method for selecting channels and controlling playback.
- Security systems: Keypad membrane-sealed 4x3 buttons are often used in security systems, where they provide a simple and effective method for arming and disarming the system.
- Medical devices: The sealed design of the keypad makes it easy to clean, which makes it a popular choice for medical devices where cleanliness is important.
- Industrial control systems: Keypad membrane sealed 4x3 buttons are commonly used in industrial control systems, where they provide a reliable and durable input method for controlling machinery and other equipment.
- Vending machines: Many vending machines use keypad membrane sealed 4x3 buttons to provide a simple and intuitive input method for selecting products and entering payment information.
- Access control systems: Keypad membrane sealed 4x3 buttons are often used in access control systems, where they provide a simple and effective method for entering passwords or other access codes.
Circuit:
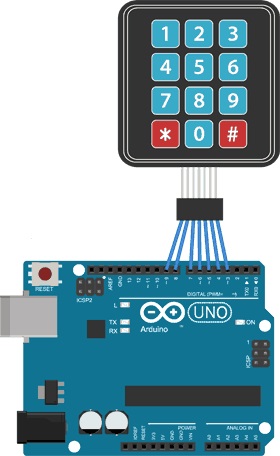
The keypad membrane sealed 4x3 button module is connected to the Arduino as follows:
- Row 1 of the keypad is connected to Arduino pin 9
- Row 2 of the keypad is connected to Arduino pin 8
- Row 3 of the keypad is connected to Arduino pin 7
- Row 4 of the keypad is connected to Arduino pin 6
- Column 1 of the keypad is connected to Arduino pin 5
- Column 2 of the keypad is connected to Arduino pin 4
- Column 3 of the keypad is connected to Arduino pin 3
Library:
To ll the Keypad library on the Arduino IDE by following these steps:
- Open the Arduino IDE
- Go to Sketch > Include Library > Manage Libraries... in the top menu
- In the Library Manager window, search for "Keypad" in the search bar
- Once you find the "Keypad" library, click on it to select it
- Click on the "Install" button to install the library
Code:
This code uses the Keypad library to read the keypad matrix. The library allows you to define the row and column pins, as well as the keymap that maps the row/column combination to a key value. In the loop function, the code reads the keypad and prints the key value to the serial monitor if a key was pressed. The delay function is used to prevent rapid key presses from being registered as multiple presses.
#include "Keypad.h"

const byte ROWS = 4; // Number of rows in the keypad matrix
const byte COLS = 3; // Number of columns in the keypad matrix

// Define the keymap - this maps the row/column combination to a key value
char keys[ROWS][COLS] = {
  {'1', '2', '3'},
  {'4', '5', '6'},
  {'7', '8', '9'},
  {'*', '0', '#'}
};

// Define the keypad object with the row and column pins
Keypad keypad = Keypad(makeKeymap(keys), rowPins, colPins, ROWS, COLS);

// Define the row and column pins
byte rowPins[ROWS] = {9, 8, 7, 6};
byte colPins[COLS] = {5, 4, 3};

void setup() {
  Serial.begin(9600);
}

void loop() {
  // Read the keypad and get the key value
  char key = keypad.getKey();

  // If a key was pressed, print the key value to the serial monitor
  if (key != NO_KEY) {
    Serial.println(key);
  }

  // Wait a short delay before reading the keypad again
  delay(10);
}
- The
#includeline at the top of the code is a preprocessor directive that tells the Arduino IDE to include the Keypad library in the sketch. This library provides a set of functions and classes that can be used to interface with keypad modules like the membrane sealed 4x3 button keypad used in this example. - The rest of the code initializes the keypad object and defines the row and column pins used to connect the keypad to the Arduino. The
makeKeymapfunction maps the row/column combinations to key values and is used to create the keymap array. This keymap is then passed as a parameter to theKeypadconstructor along with the row and column pin arrays, as well as the number of rows and columns in the keypad matrix. - In the
loopfunction, thegetKeymethod of thekeypadthe object is used to read the currently pressed key from the keypad. If a key is detected, its value is printed to the serial monitor using theSerial.printlnmethod. A short delay is then added to prevent the code from reading the keypad too quickly.
Technical Details:
- Keypad dimensions: 70mm x 77mm x 1mm (2.75" x 3" x 0.035")
- Length of cable + connector: 85mm
- 7-pin 0.1" pitch connector
- Operating temperature range: -20°C to 60°C
- Contact resistance: < 100 ohms
- Contact bounce: < 5ms
- Maximum contact rating: 20V DC, 20mA
- Insulation resistance: > 100M ohms at 100V DC
- Operating force: 150-200g
- Life expectancy: 1 million cycles
Resources:
Comparison:
Both the Keypad Membrane Sealed 4x3 Button and the Keypad 4x3 Matrix Black PCB Module are keypads with 12 keys arranged in a 4x3 matrix. However, there are some differences in the way they are constructed and how they are used:
- Construction: The Keypad Membrane Sealed 4x3 Button is a flexible, thin-film keypad with a sealed membrane that protects it from dust and water. The Keypad 4x3 Matrix Black PCB Module is a printed circuit board with discrete push-button switches mounted on it.
- Interface: The Keypad Membrane Sealed 4x3 Button is typically connected to a microcontroller or other device using a ribbon cable with a connector at the end. The Keypad 4x3 Matrix Black PCB Module has pins that can be directly soldered onto a PCB or breadboard.
- Tactile Feedback: The Keypad Membrane Sealed 4x3 Button has a softer, more tactile feel when the keys are pressed. The Keypad 4x3 Matrix Black PCB Module has a more traditional push-button feel with a distinct click.
- Durability: The Keypad Membrane Sealed 4x3 Button is more durable than the Keypad 4x3 Matrix Black PCB Module, due to its sealed membrane design. The Keypad 4x3 Matrix Black PCB Module is more prone to wear and tear, particularly on the push-button switches.
- Cost: The Keypad Membrane Sealed 4x3 Button is typically less expensive than the Keypad 4x3 Matrix Black PCB Module.
you can say, both keypads have their advantages and disadvantages, and which one to choose depends on the specific needs of the project. The Keypad Membrane Sealed 4x3 Button may be a better choice for applications where durability and resistance to environmental factors is important, while the Keypad 4x3 Matrix Black PCB Module may be better suited for applications where a more traditional push-button feel is desired.