Out Of Stock
Description
The LCD 5.0 Nextion Touch TFT Serial Display Panel Module NX8048T050 is a 5-inch touchscreen display module with a resolution of 800x480 pixels. It has a built-in microcontroller and communication interface, which allows for easy integration with a variety of microcontrollers and other devices. It is designed to be user-friendly and easy to program, with a drag-and-drop interface for creating custom user interfaces. It also features a variety of pre-designed widgets and graphics for quick and easy development.
Package Includes:
- 1 x 5.0 Nextion Touch TFT Serial Display Module
Features:
- Wide operating voltage range from 4.8V to 20V, making it compatible with a variety of power sources.
- Low power consumption in idle mode is only 50uA, which makes it an energy-efficient solution for battery-powered projects. In fully active mode, the power consumption is 65mA.
- High reliability due to the use of the BISS0001 PIR processing chip.
- Adjustable sensitivity or detection distance allows you to customize the module to fit the specific needs of your project.
- Adjustable output time delay lets you control how long the output signal remains high after detecting motion.
- Can be used separately without any additional microcontroller or platform like Arduino or Raspberry Pi, but it can also be interfaced with these platforms to enhance your project.
- The low cost makes it an affordable choice for hobbyists and DIY projects.
- 120-degree detection angle ensures a wide coverage area for detecting motion.
- A detection range of 3 to 7 meters or more makes it suitable for a variety of applications.
- Easy to communicate with any platform like Arduino or Raspberry Pi and all microcontrollers, making it a versatile component for your project.
Description:
The NX8048T050 is a 5-inch intelligent TFT LCD display module with a capacitive touchscreen, designed for embedded systems and industrial applications. It has a resolution of 800x480 pixels, a brightness of 500cd/m2, and a viewing angle of 70 degrees in all directions. A key feature of the Nextion display module is its built-in microcontroller and communication interface, which allows for easy integration with a variety of microcontrollers and other devices. It uses a serial interface to communicate with the host device, which simplifies the design and reduces the number of wires required. The Nextion display module is also designed to be user-friendly and easy to program. It comes with a drag-and-drop interface that allows users to create custom user interfaces without requiring any coding. This feature makes it an excellent choice for hobbyists, makers, and developers who want to add a display to their projects without spending a lot of time on software development. also, the display includes a drag-and-drop interface, the Nextion display module, and a variety of pre-designed widgets and graphics for quick and easy development. These widgets include buttons, sliders, gauges, text boxes, and more. The graphics are customizable, and users can create their own graphics using a graphics editor. The Nextion display module is powered by an ARM Cortex-M0 processor and has 16MB of flash memory and 1024 bytes of EEPROM. It also has a real-time clock and supports multiple languages.
Principle of Work:
The LCD 5.0 Nextion Touch TFT Serial Display Panel Module NX8048T050 works by using a combination of hardware and software to display images and interact with the user. Here's a summary of the working principle:
- Hardware: The Nextion display module consists of a TFT LCD screen, a touch panel, a microcontroller, and a communication interface. The microcontroller controls the display and handles user input from the touch panel. The communication interface allows the display module to communicate with a host device, such as an Arduino or Raspberry Pi, using a serial protocol.
- Software: The Nextion display module comes with software that allows users to design their own custom user interfaces using a drag-and-drop interface. The software generates a binary file that is uploaded to the display module's flash memory. This file contains all the graphics, text, and user interface elements that make up the display.
- Interaction: When the display module is connected to a host device, the host sends commands to the display module to update the display and respond to user input. For example, if the user touches a button on the screen, the touch panel sends a signal to the microcontroller, which in turn sends a message to the host device indicating which button was pressed. The host device can then respond by performing a specific action, such as turning on an LED or sending data to a server.
- Customization: The Nextion display module is highly customizable, allowing users to create their own graphics, animations, and user interfaces. The module supports a variety of file formats, including BMP, JPEG, and GIF, and can display images, text, and even video.
Pinout of the Module:

Pinout of the UART Connecter
- 5V - Power Supply (5V DC)
- GND - Ground
- TX - Serial Data Transmit Pin (TTL Level)
- RX - Serial Data Receive Pin (TTL Level)
- NC - Not Connected
Applications:
- Home automation systems - the display can be used to provide a user interface for controlling smart home devices, such as lighting, temperature, and security systems.
- Industrial control systems - the display can be used to monitor and control machinery, displaying real-time data and allowing operators to adjust settings as needed.
- Automotive displays - the display can be used in automotive applications, such as navigation systems, media players, and vehicle diagnostics.
- Medical equipment - the display can be used in medical equipment, such as patient monitoring devices, where a clear and easy-to-read display is important.
- DIY electronics projects - the display can be used in hobbyists and DIY electronics projects, such as building your own smartwatch, weather station, or home automation system.
Circuit:
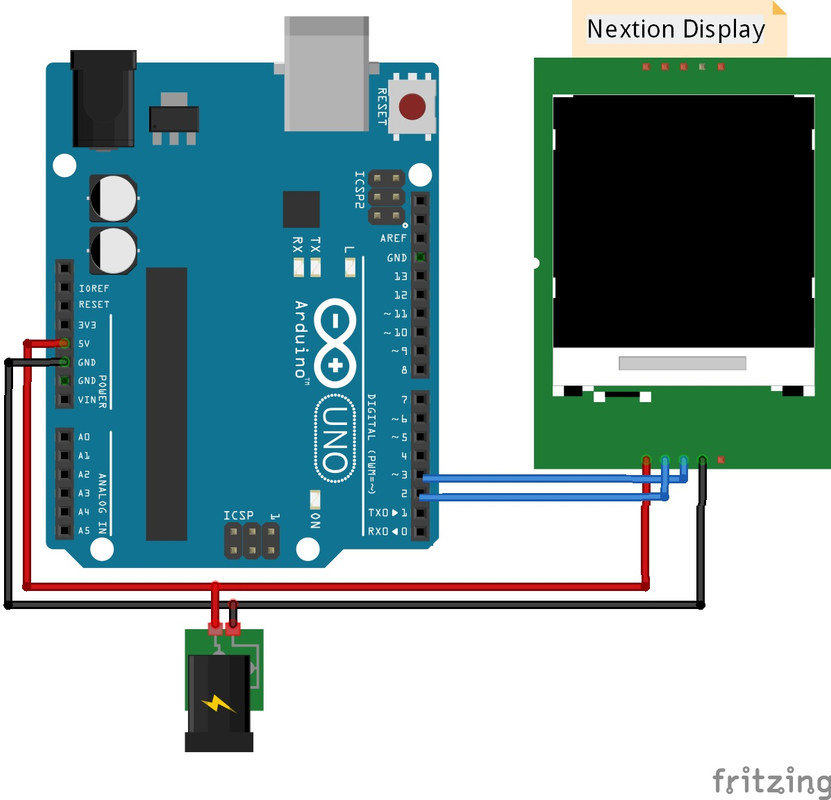
- Connect the Nextion display's VCC pin to both the Arduino's 5V pin and the external 5V power supply's positive terminal.
- Connect the Nextion display's TX pin to the Arduino's RX pin (pin 0).
- Connect the Nextion display's RX pin to the Arduino's TX pin (pin 1).
- Connect the Nextion display's GND pin to the Arduino's GND pin.
- Connect the external 5V power supply's negative terminal to the Arduino's GND pin.
Library:
In the example code using the Nextion.h library, you don't need to create the button on the display using serial commands from Arduino. Instead, you can create the button directly on the display using the Nextion Editor software, and then use the NexButton object to register the button with the Arduino code.
To create a button on the display using the Nextion Editor software, follow these steps:
- Open the Nextion Editor software and create a new project.
- Drag and drop a button component onto the canvas.
- In the Properties pane, set the
objnameproperty to "bt0". - Set the button's text and appearance properties to your liking.
- Save the project and compile it to generate the
.tftfile. - Upload the
.tftfile to the Nextion display using the Nextion Editor software or a microSD card.
Once the button is created on the display and uploaded, you can use the NexButton object in the Arduino code to register the button and the led_toggle() function, as shown in the example code using the Nextion.h library.
Code:
code for the 5.0 Nextion Touch TFT Serial Display Panel Module NX8048T050 with Arduino Uno connected through serial, which will toggle the onboard LED on and off when a button on the display is pressed:
#include "Nextion.h"

// Define the Nextion display object
NexButton bt0 = NexButton(0, 1, "bt0");

// Define the LED pin
int ledPin = 13;

void setup() {
  // Set the LED pin as an output
  pinMode(ledPin, OUTPUT);

  // Initialize the Nextion display object
  nexInit();

  // Register the button object and the LED control function
  bt0.attachPop(led_toggle);
}

void loop() {
  // Process any pending communication with the Nextion display
  nexLoop(nex_listen_list);
}

// Function to toggle the onboard LED on and off
void led_toggle(void *ptr) {
  digitalWrite(ledPin, !digitalRead(ledPin));
}
This code uses the Nextion.h library to simplify communication with the Nextion display. It defines a NexButton object for the button on the display, and registers it with the led_toggle() function, which toggles the onboard LED on and off.
Note that the led_toggle() function takes a void *ptr parameter, which is required by the NexButton object's attachPop() function. However, this parameter is not used in this example code. Also, note that the nexLoop() function processes any pending communication with the Nextion display and must be called periodically in the loop() function.
Technical Details:
| Data | Description | |
| Color | 64K 65536 colors | 16 bit 565, 5R-6G-5B |
| Layout size | 133.5(L)×84(W)×5(H) | NX8048T050_011N |
| 133.5(L)×84(W)×6.2(H) | NX8048T050_011R | |
| Active Area (A.A.) | 118.50mm(L)×77.55mm(W) | |
| Visual Area (V.A.) | 108mm(L)×64.8mm(W) | |
| Resolution | 800×480 pixel | Also can be set as 480×800 |
| Touch type | Resistive | |
| Touches | > 1 million | |
| Backlight | LED | |
| Backlight lifetime (Average) | >30,000 Hours | |
| Brightness | 250 nit (NX8048T050_011N) | 0% to 100%, the interval of adjustment is 1% |
| 230 nit (NX8048T050_011R) | 0% to 100%, the interval of adjustment is 1% | |
| Weight | 108g (NX8048T050_011N) | |
| 128g (NX8048T050_011N) |
Electronic Characteristics
| Test Conditions | Min | Typical | Max | Unit | |
| Operating Voltage | 4.75 | 5 | 7 | V | |
| Operating Current | VCC=+5V, Brightness is 100% | – | 410 | – | mA |
| SLEEP Mode | – | 15 | – | mA | |
| Power supply recommend:5V, 1A, DC | |||||
Working Environment & Reliability Parameter
| Test Conditions | Min | Typical | Max | Unit | |
| Working Temperature | 5V, Humidity 60% | -20 | 25 | 70 | °C |
| Storage Temperature | -30 | 25 | 85 | °C | |
| Working Humidity | 25°C | 10% | 60% | 90% | RH |
Interfaces Performance
| Test Conditions | Min | Typical | Max | Unit | |
| Serial Port Baudrate | Standard | 2400 | 9600 | 115200 | bps |
| Output High Voltage | IOH=-1mA | 3.0 | 3.2 | V | |
| Output Low Voltage | IOL=1mA | 0.1 | 0.2 | V | |
| Input High Voltage | 2.0 | 3.3 | 5.0 | V | |
| Input Low Voltage | -0.7 | 0.0 | 1.3 | V | |
| Serial Port Mode | TTL | ||||
| Serial Port | 4Pin_2.54mm | ||||
| USB interface | NO | ||||
| SD card socket | Yes (FAT32 format), support maximum 32G Micro SD Card * microSD card socket is exclusively used to upgrade Nextion firmware /HMI design |
||||
Memory Features
| Memory Type | Test Conditions | Min | Typical | Max | Unit |
| FLASH Memory | Store fonts and images | 16 | MB | ||
| RAM Memory | Store variables | 3584 | BYTE |
Resources:
How to draw in the nextion program
Comparisons:
The NX8048T050 Nextion and the ILI9341-based touch screens are both graphical touch screens, but they differ in several ways:
- Display size: The NX8048T050 has a larger display size of 5.0 inches, compared to the typical size of ILI9341-based touch screens, which is usually around 2.4 inches to 3.2 inches.
- Resolution: The NX8048T050 has a higher resolution of 800 x 480 pixels, compared to the ILI9341-based touch screens, which typically have resolutions of 320 x 240 pixels or 240 x 320 pixels.
- Integrated touch controller: The NX8048T050 has an integrated touch controller, while the ILI9341-based touch screens typically require an additional touch controller IC to be connected to the display.
- Built-in memory: The NX8048T050 has 128MB of built-in memory for storing graphics and fonts, which can reduce the workload on the host MCU, while the ILI9341-based touch screens typically do not have built-in memory.
- Communication protocol: The NX8048T050 uses a serial communication protocol, while the ILI9341-based touch screens typically use a parallel communication protocol.
- Price: The NX8048T050 is generally more expensive than the ILI9341-based touch screens, due to its larger size, higher resolution, and integrated touch controller.
the NX8048T050 is a more advanced and feature-rich touchscreen compared to the ILI9341-based touch screen, but it is also more expensive. The choice between the two depends on the specific application requirements and budget.