AED 51.45
Description
The Arduino Pro Mini is an incredibly streamlined version of the Arduino that offers unparalleled simplicity and flexibility. Powered by 5V and running at a blazing 16MHz, this miniaturized Arduino is equipped with a convenient bootloader, ensuring hassle-free programming. the Arduino Pro Mini removed the USB connector and Serial Converter by design, allowing you the freedom to personalize your setup with your preferred connector or wire while also keeping the price remarkably affordable. Prepare to embark on a journey of creativity and customization with the Arduino Pro Mini.
Package Includes:
- 1 x Arduino Pro Mini Atmega328p of 5v/16MHz Blue (Compatible)
Features:
- Compact Design: The Arduino Pro Mini is designed to be extremely small and compact, making it ideal for projects with limited space requirements.
- Minimalist Design: It embodies a minimalistic approach, focusing on essential features while omitting non-essential components to reduce size and cost.
- 5V Operating Voltage: The board operates at a stable 5V, ensuring compatibility with a wide range of components and sensors.
- 16 MHz Clock Frequency: With a clock frequency of 16 MHz, the Pro Mini can execute instructions quickly and efficiently.
- Atmega328p Microcontroller: It is powered by the Atmega328p, an 8-bit AVR microcontroller known for its reliability and versatility.
- Onboard Bootloader: The Pro Mini comes pre-programmed with a bootloader, allowing for easy and convenient uploading of sketches via a compatible programmer.
- Flexible Power Options: It can be powered via a raw voltage input ranging from 5V to 12V, providing flexibility in power supply choices.
- GPIO Pins: The Pro Mini offers a total of 14 digital I/O pins, enabling connection and control of various digital components and devices.
- Analog Inputs: It features 8 analog input pins, allowing for precise measurement and interaction with analog sensors.
- Flash Memory: With 32K bytes of onboard flash memory, the Pro Mini provides ample space for storing your program code.
- EEPROM: It includes a 1K byte of EEPROM, which enables data storage that persists even when the power is turned off.
- Internal RAM: The Pro Mini has 2K bytes of internal RAM, allowing for efficient data handling and manipulation during program execution.
- Maximum I/O Pin Current: Each I/O pin can handle a maximum current of 40mA, providing sufficient capability for driving various devices.
- Maximum Total Chip Current: The total current drawn from the chip should not exceed 200mA to prevent overloading.
- Operating Temperature Range: Designed to withstand a wide range of temperatures, the Pro Mini can operate reliably from -40ºC to +105ºC.
- Auto-Reset Support: The board supports auto-reset functionality, simplifying the programming process and reducing the need for manual resets.
- Onboard Power and Status LEDs: The Pro Mini features LEDs that provide visual indications of power supply and status, making it easier to monitor the board's operation.
Description:
The Arduino Pro Mini is an exceptional variant of the Arduino platform, designed with a minimalistic approach that prioritizes compactness and affordability. Running at 5V and featuring a 16MHz clock frequency, this board offers the same core functionality as its larger counterparts. However, what sets the Pro Mini apart is its reduced size and the absence of a built-in programmer and USB port. By omitting the USB connector and serial converter, the Pro Mini grants users the freedom to customize their connections by soldering in any suitable connector or wire of their choice. This not only allows for a more tailored setup but also contributes to a lower price point, making the Pro Mini an attractive option for budget-conscious projects. While the Pro Mini shares similar functionality with the Arduino UNO, its distinguishing features lie in its compact form factor and lack of a built-in programmer and USB port. Despite these differences, the Pro Mini compensates with the inclusion of onboard voltage regulators, specifically a 5V regulator, ensuring stable and reliable power distribution. With the Arduino Pro Mini, you can embrace the advantages of a smaller footprint and the flexibility to adapt the board to your specific needs while still enjoying the extensive capabilities and support of the Arduino ecosystem.
Principle of Work:
The Arduino Pro Mini operates on the principle of being a free hardware platform, where its blueprints and specifications are readily available for anyone to copy and utilize. This open approach empowers individuals and businesses to design their own unique Arduino boards while still maintaining compatibility with the broader Arduino framework. Similarly, the Arduino software is based on the concept of free software, providing access to the source code, and allowing users to freely use and modify it according to their specific requirements. To facilitate the development of applications for Arduino boards and provide a wide range of utilities, the Arduino Pro Mini seamlessly integrates with the Arduino IDE (Integrated Development Environment) platform. This powerful software tool serves as a programming and uploading environment for your code, commonly referred to as a "sketch." To upload sketches to the Pro Mini, you can utilize an external Serial Converter, thanks to the embedded bootloader that simplifies the programming process. The Pro Mini leverages the vast collection of libraries available for the Arduino ecosystem, which can be easily downloaded online. These libraries provide pre-written code that simplifies the integration of various sensors and modules into your projects. This means that even if you are not familiar with the intricate workings of individual components, you can still program and utilize a wide array of sensors and modules, thanks to the extensive library support.
Internally, the Arduino Pro Mini 16MHz 5V operates using various components and circuits that enable its functionality:
- Microcontroller: The heart of the Arduino Pro Mini is the Atmega328p microcontroller. It is an 8-bit AVR microcontroller that runs at 16MHz and operates at 5V.
- Clock Circuit: The board includes a clock circuit that generates the 16MHz clock signal needed for the microcontroller's operation. This clock signal synchronizes the execution of instructions and the timing of various operations.
- Voltage Regulation: The Pro Mini incorporates voltage regulation to ensure a stable 5V power supply. It typically includes a voltage regulator, such as the AMS1117, which converts the input voltage (ranging from 5V to 12V) to a consistent 5V level.
- Power Supply: The board can be powered either through the RAW pin or the VCC pin. The RAW pin accepts a voltage input between 5V and 12V, while the VCC pin requires a stable 5V power source.
- Reset Circuit: The Arduino Pro Mini has a reset circuit that allows the microcontroller to be reset programmatically or through a physical reset button. This circuit ensures a proper restart of the program execution when necessary.
- I/O Pins: The Pro Mini provides a number of digital I/O pins (14 in total) that can be used for both input and output operations. These pins can be configured as either high or low, allowing for communication with external devices, sensor inputs, or control of other components.
- Analog Input Pins: The board features 8 analog input pins that can be used to read analog voltage values from sensors or other analog devices. These pins convert the continuous analog signals into digital values using the microcontroller's built-in Analog-to-Digital Converter (ADC).
- Serial Communication: The Pro Mini supports serial communication through its RX (receive) and TX (transmit) pins. It can be connected to other devices, such as a computer, using an external USB-to-serial converter or FTDI breakout board. This allows for programming and serial data communication between the Pro Mini and external devices.
- Programming Interface: The Pro Mini can be programmed using the Arduino IDE (Integrated Development Environment). To upload a sketch (program) to the board, an external programmer or a USB-to-serial converter is typically used to establish a connection between the Pro Mini and the computer.
Pinout of the Module:
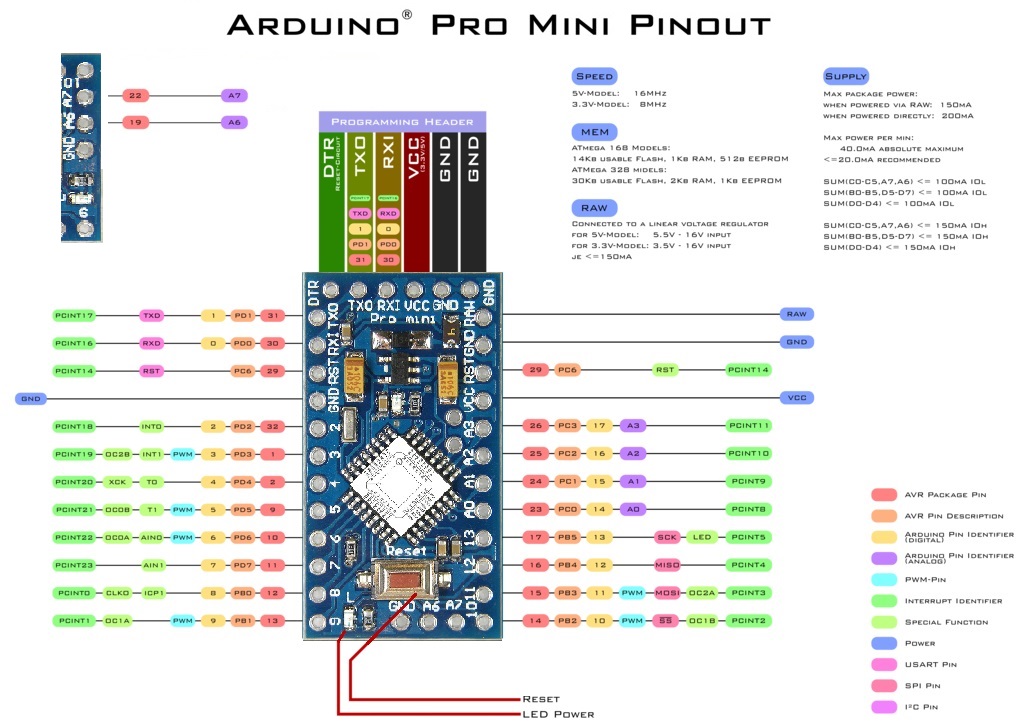
| Pin | Name | Description |
|---|---|---|
| A0 | Analog | Analog input pin for measuring voltage levels (0 to 5V range) |
| A1 | Analog | Analog input pin for measuring voltage levels (0 to 5V range) |
| A2 | Analog | Analog input pin for measuring voltage levels (0 to 5V range) |
| A3 | Analog | Analog input pin for measuring voltage levels (0 to 5V range) |
| A4 | Analog | Analog input pin for measuring voltage levels (0 to 5V range) |
| A5 | Analog | Analog input pin for measuring voltage levels (0 to 5V range) |
| A6 | Analog | Analog input pin for measuring voltage levels (0 to 5V range) |
| A7 | Analog | Analog input pin for measuring voltage levels (0 to 5V range) |
| 0 | RX1 | A serial data input pin (receive) |
| 1 | TX0 | Serial data output pin (transmit) |
| 2 | General-purpose digital I/O pin | |
| 3 | PWM | Digital I/O pin with PWM (pulse width modulation) capability |
| 4 | General-purpose digital I/O pin with external interrupt (INT0) | |
| 5 | General-purpose digital I/O pin with external interrupt (INT1) | |
| 6 | PWM | Digital I/O pin with PWM capability |
| 7 | General-purpose digital I/O pin | |
| 8 | General-purpose digital I/O pin | |
| 9 | PWM | Digital I/O pin with PWM capability |
| 10 | SPI SS | SPI Slave Select pin |
| 11 | SPI MOSI | SPI Master Output, Slave Input pin |
| 12 | SPI MISO | SPI Master Input, Slave Output pin |
| 13 | SPI SCK | SPI Clock pin |
| RAW | Raw voltage input pin (5V to 12V range) | |
| VCC | 5V power supply pin | |
| GND | Ground pin |
Applications:
- Prototyping: The Arduino Pro Mini is ideal for prototyping electronic projects due to its compact size and versatile functionality. It allows you to quickly test and develop ideas, creating proof-of-concept models.
- Robotics: The board can be used in robotics projects to control motors, sensors, and actuators. It enables you to build autonomous robots, robotic arms, or robotic vehicles by integrating various sensors and programming the board to perform desired actions.
- Home Automation: With its digital and analog input/output pins, the Pro Mini can be employed in home automation projects. You can connect and control devices such as lights, temperature sensors, motion sensors, and smart switches to automate and monitor your home.
- Internet of Things (IoT): The board can be utilized in IoT applications where it connects with other devices and sensors to collect and transmit data to the Internet. It allows you to build IoT projects like weather stations, environmental monitoring systems, or smart home devices.
- Sensor Interfacing: The Pro Mini can interface with various sensors such as temperature sensors, humidity sensors, light sensors, and motion sensors. You can capture data from the sensors and use it for environmental monitoring, data logging, or triggering specific actions.
- Data Logging: The board can log data from sensors or external devices to an SD card or transmit it to a computer or cloud storage. This feature is useful for applications like weather monitoring, energy consumption tracking, or scientific experiments.
- Wearable Electronics: Due to its small size and low power consumption, the Arduino Pro Mini can be used in wearable electronics projects. It enables the creation of smart wearable devices such as fitness trackers, smartwatches, or gesture-controlled accessories.
- Education: The Pro Mini serves as an excellent educational tool for learning electronics and programming. It provides a hands-on experience for students to understand concepts like digital and analog sensing, control systems, and programming logic.
Circuit:
We will not need any circuit, in this testing code, we will rely on the built-in LED on the 13th pin.
Connecting with Arduino First Time
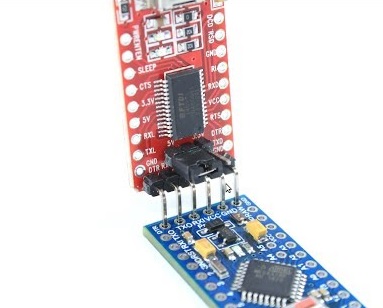
To program the Arduino Pro Mini, you have the option to choose the connection method for the FTDI Basic Breakout or other USB-to-serial converters. Here's a clear and organized explanation:
-
Programming Header: The Pro Mini has a row of six pins on the side of the board labeled as "BLK," "GND," "VCC," "RXI," "TXO," and "GRN." This header is used for programming the board.
Pin Label Description 1 BLK To be connected to GND 2 GND Ground 3 VCC 5V Power Supply 4 RXI Receive Data (Serial Input) 5 TXO Transmit Data (Serial Output) 6 GRN To be connected to RESET Note: It's recommended to use male headers on the Pro Mini's programming header, as the FTDI Basic board uses a female header.
-
FTDI Basic Breakout Connection: If this is your first time using the FTDI Basic Breakout, you might need to install drivers for it.
- Visit the official FTDI website: https://www.ftdichip.com/Drivers.aspx
- Select your operating system.
- Choose the driver package that matches your operating system version and architecture.
- Download the driver package.
- Locate and extract the downloaded file.
- Run the driver installer executable file.
- Follow the on-screen instructions to install the FTDI drivers.
- Connect the FTDI device to your computer.
- Verify the driver installation in Device Manager (Windows) or System Information (macOS).
- You can now use the FTDI device to communicate with your Arduino Pro Mini.
-
Other USB-to-Serial Converters: Apart from the FTDI, there are other USB-to-serial converters like CH340, CP210X, CY7C65213, etc., that can also be used to upload code to the Arduino Pro Mini. If you are using a different converter, make sure to check the board's specifications and install the respective driver for your specific USB-to-serial converter.
By following these steps, you'll be able to choose the appropriate connection method and successfully program your Arduino Pro Mini.
- Download the Arduino IDE: Get the Arduino IDE from the official software page here.
- Install the Arduino IDE: Install the downloaded Arduino IDE on your computer.
- Open Arduino IDE: Launch the Arduino IDE once it's installed.
- Select Board: In the Arduino IDE, go to
Tools > Boardand chooseArduino Pro or Pro Mini. - Select Processor: Still in
Tools, go toProcessorand selectATmega328 (5V, 16MHz). - Select the Port: Make sure your computer detects the board. To do this, navigate to
Tools > Portand select the board from the available list. The available ports may vary depending on the USB-to-serial converter you are using. - Uploading a simple example: just copy paste the following example and To upload the sketch, simply click on the arrow in the top left corner. This process takes a few seconds, and it is important to not disconnect the board during this process. When the code is uploaded, the text "Done uploading." is visible in the bottom left corner.
Code:
This code will make the built-in LED on pin 13 of the Arduino Pro Mini blink on and off every second. It will also print the current LED status ("ON" or "OFF") to the serial monitor at a baud rate of 9600:
Make sure you have the Arduino Pro Mini selected as the board and the correct serial port chosen in the Arduino IDE before uploading the code. Open the serial monitor to view the LED status messages once the code is uploaded and running on the board.
// Pin connected to the LED
const int LED_PIN = 13;

// Variable to store LED state
bool ledState = false;

void setup() {
  // Initialize LED pin as an output
  pinMode(LED_PIN, OUTPUT);

  // Start serial communication at 9600 baud rate
  Serial.begin(9600);
}

void loop() {
  // Toggle the LED state
  ledState = !ledState;

  // Set the LED pin to the new state
  digitalWrite(LED_PIN, ledState);

  // Print LED status to serial monitor
  Serial.print("LED Status: ");
  Serial.println(ledState ? "ON" : "OFF");

  // Delay for 1 second
  delay(1000);
}
const int LED_PIN = 13;defines a constant variable namedLED_PINand assigns it the value13. This indicates that the LED is connected to pin 13 on the Arduino Pro Mini.bool ledState = false;declares a Boolean variable calledledStateand initializes it with the valuefalse. This variable will be used to store the state of the LED.void setup()is the setup function that runs once when the Arduino is powered on or reset.pinMode(LED_PIN, OUTPUT);sets the LED pin (LED_PIN) as an output pin, which means it will be used to send electrical signals to the LED.Serial.begin(9600);initializes the serial communication at a baud rate of 9600. This allows communication between the Arduino and the serial monitor on your computer.void loop()is the main loop function that repeats continuously after the setup function has completed.ledState = !ledState;toggles the value ofledStateusing the logical NOT operator (!). This will alternate the state betweentrueandfalsein each iteration of the loop.digitalWrite(LED_PIN, ledState);sets the state of the LED pin (LED_PIN) to the value ofledState. IfledStateistrue, the LED will turn on; ifledStateisfalse, the LED will turn off.Serial.print("LED Status: ");prints the string "LED Status: " to the serial monitor.Serial.println(ledState ? "ON" : "OFF");prints the current state of the LED (ledState) to the serial monitor. IfledStateistrue, it prints "ON"; ifledStateisfalse, it prints "OFF". The?:ternary operator is used here for conditional printing.delay(1000);adds a delay of 1 second between each iteration of the loop, causing the LED to blink at a frequency of 1 Hz (on for 1 second, off for 1 second).
Technical Details:
- ATmega328 working at 16 MHz
- Auto-reset support
- 5V regulating circuit
- Max 200mAoutput
- Over current protection
- 5-12V DC input
- Length: 33 mm
- Width: 18 mm
Resources:
- You might also want to look at: the reference for the Arduino language.
Getting Started Tutorial - GitHub
- Download the Arduino IDE: here.
- official FTDI website: https://www.ftdichip.com/Drivers.aspx
Comparisons:
The Arduino Pro Mini and Arduino Uno are both popular development boards with similarities and differences, the choice between the Arduino Pro Mini and Arduino Uno depends on the specific requirements of your project. If you need a compact board with more analog inputs and are comfortable with external programming methods, the Pro Mini may be a suitable choice. On the other hand, if you prefer a larger board with built-in USB connectivity and a more beginner-friendly experience, the Uno would be a better option:
-
Size:
- Arduino Pro Mini: The Pro Mini is much smaller in size compared to the Arduino Uno, making it ideal for projects with space constraints or wearable applications.
- Arduino Uno: The Uno is larger in size and comes in the standard Arduino form factor, which may be more suitable for projects that require easy access to connectors and shields.
-
Pins:
- Arduino Pro Mini: The Pro Mini offers 14 digital I/O pins and 8 analog input pins, providing sufficient flexibility for connecting various sensors and peripherals.
- Arduino Uno: The Uno has 14 digital I/O pins and 6 analog input pins, which means it has fewer analog inputs compared to the Pro Mini.
-
Voltage:
- Arduino Pro Mini: The Pro Mini comes in different voltage options, such as 5V and 3.3V, allowing compatibility with various components and devices that require different voltage levels.
- Arduino Uno: The Uno operates at 5V, which is the standard voltage for most Arduino boards.
-
Power Supply:
- Arduino Pro Mini: The Pro Mini has a slightly lower power supply compared to the Uno, which may affect power-hungry projects.
- Arduino Uno: The Uno provides a stable and standard power supply suitable for various projects.
-
USB Connectivity:
- Arduino Pro Mini: The Pro Mini does not have a built-in USB connector or Serial Converter, which means an external programmer or USB-to-serial converter is required for programming and communication with the computer.
- Arduino Uno: The Uno comes with a built-in USB connector, making it easy to connect to a computer for programming and serial communication.
-
Programming Ease:
- Arduino Pro Mini: The Pro Mini can be a bit more challenging for beginners due to the need for an external programmer or USB-to-serial converter. However, experienced users may find it more suitable for space-constrained projects.
- Arduino Uno: The Uno is beginner-friendly with its built-in USB connectivity, which simplifies the programming and communication process.