AED 14.50
Description
The Soil Moisture Sensor & Soil Hygrometer Detection Module is a device that measures the amount of moisture present in soil. It consists of an electrical board and a probe with two pads that detect the presence of water. The device is commonly used in creating automated watering systems or monitoring soil moisture levels in plants. The package includes the sensor and an amplifier module along with two Dupont wires, female to female.
Package Includes:
- 1 x Soil Moisture Sensor & Soil Hygrometer Detection Module
- 1 x Amplifier Module
- 2 x Dupont Wires Female to Female.
Features:
- An extremely sensitive sensor that can detect soil humidity
- Adjustable sensitivity through blue digital potentiometer adjustment
- Dual output mode, including analog output for more accurate readings
- Fixed bolt hole for easy installation
- Includes power indicator (red) and digital switching output indicator (green)
- Equipped with an LM393 comparator chip for stability
- Enables the creation of an automated watering mechanism to save plants from withering due to lack of water during the absence or missed watering time
- Helps plants grow more comfortably and make the garden smarter
- The surface has undergone plating treatment to improve electrical conductivity and corrosion resistance
- Simple to set up and use
Description:
The Soil Moisture Sensor & Soil Hygrometer Detection Module is a highly sensitive and accurate device that can detect soil humidity. Its adjustable sensitivity feature, indicated by the blue digital potentiometer adjustment, enables it to be customized for different soil types and environmental conditions. The module has a dual output mode, including an analog output that provides more accurate readings than other output modes. This feature helps users to have a clear and precise understanding of the moisture level of the soil. The sensor has a fixed bolt hole, which makes it easy to install, and it is equipped with a power indicator (red) and a digital switching output indicator (green). The LM393 comparator chip in the module ensures stability, while the surface plating treatment enhances electrical conductivity and corrosion resistance, making the device durable. The Soil Moisture Sensor & Soil Hygrometer Detection Module can be used to create an automated watering system that helps save plants from withering due to a lack of water, especially during extended absences or missed watering time. Using these sensors not only helps to save plants but also makes gardens smarter by providing real-time soil moisture data.
Principle of Work:
The soil moisture sensor module works by using a fork-shaped conductive probe that has two exposed conductive plates. These plates act as a variable resistors, increasing in resistance depending on the moisture content of the soil. The module computes the soil moisture content based on the difference in resistance between the two conducting plates. When the soil is deficient in water, the module will provide low simulation values; otherwise, it will produce high simulation values. To use the sensor, the conductive probe is simply attached to the soil. The probe's resistance is then measured by an electrical module that is connected to an Arduino. The module creates an output voltage that is dependent on the probe's resistance, which is accessible through an Analog Output (AO) pin. The same signal is supplied to an LM393 High Precision Comparator, which digitizes and outputs it to a Digital Output (DO) pin. The sensitivity of the digital output (DO) can be adjusted using a potentiometer that is included in the module. This adjustment allows you to define a threshold such that when the soil moisture level exceeds the threshold, the module outputs LOW; otherwise, it outputs HIGH. This configuration is ideal for activating an action when a given threshold is met. For example, if the moisture level in the soil surpasses a given threshold, a relay can be activated to begin watering the plant. The module also has two LEDs - a Power LED and a Status LED. The Power LED glows when the module is turned on, and the Status LED illuminates when the soil moisture level exceeds the threshold value. Additionally, the surface of the sensor has undergone plating treatment to improve electrical conductivity and corrosion resistance, making it more durable and reliable.
Corrosion can be prevented by taking proper precautions and implementing certain techniques. Here are some ways to lower corrosion from happening to the soil moisture sensor and lengthen its lifespan:
- Ensuring that the wiring and connectors used to connect the sensor to other components are also corrosion-resistant and properly sealed to prevent moisture from entering.
- Regularly check the sensor and clean any debris or buildup that may accumulate around it, which could contribute to corrosion over time.
- Minimizing the time the sensor is turned on in the code can help reduce corrosion and prolong the life of the sensor. One way to do this is by programming the microcontroller to only turn on the sensor at specific intervals, such as once every hour or every few hours, to take readings and then turn it off again. This reduces the amount of time the sensor is exposed to moisture, which can help prevent corrosion.
Pinout of the Module:
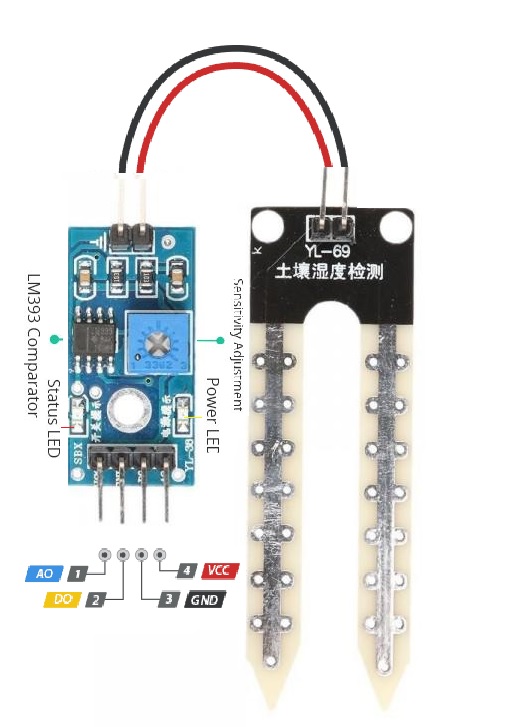
- AO (Analog Output) generates an analog output voltage that is proportional to the soil moisture level. A higher moisture level will result in a higher voltage, while a lower moisture level will produce a lower voltage.
- DO (Digital Output) indicates if the soil moisture level is within the acceptable range. When the moisture level exceeds the threshold value set by the potentiometer, D0 becomes LOW; otherwise, it is HIGH.
- The sensor is powered by VCC, which should be supplied between 3.3V and 5V. The analog output of the sensor varies with the voltage supplied to it.
- GND stands for ground, which is connected to the negative terminal of the power supply.
Applications:
- Automated watering systems for plants and crops: The sensor can be used to create an automated watering system that waters plants or crops based on the moisture content of the soil, saving water and ensuring that plants are not over or under-watered.
- Environmental monitoring: The sensor can be used to monitor soil moisture levels in fields, gardens, and forests, providing information on drought conditions and helping to prevent wildfires.
- Agriculture: The sensor can be used in agriculture to monitor the moisture content of the soil, ensuring that crops receive the appropriate amount of water, which can increase crop yield and reduce water waste.
- Soil analysis: The sensor can be used to collect data on soil moisture levels, which can be used for soil analysis and research.
- Landscaping: The sensor can be used in landscaping to ensure that plants and lawns receive the appropriate amount of water, reducing water waste and saving money on water bills.
- Horticulture: The sensor can be used in horticulture to ensure that plants receive the appropriate amount of water, which can improve plant health and growth.
- Home gardening: The sensor can be used in home gardening to monitor the soil moisture levels of indoor and outdoor plants, ensuring that they receive the appropriate amount of water.
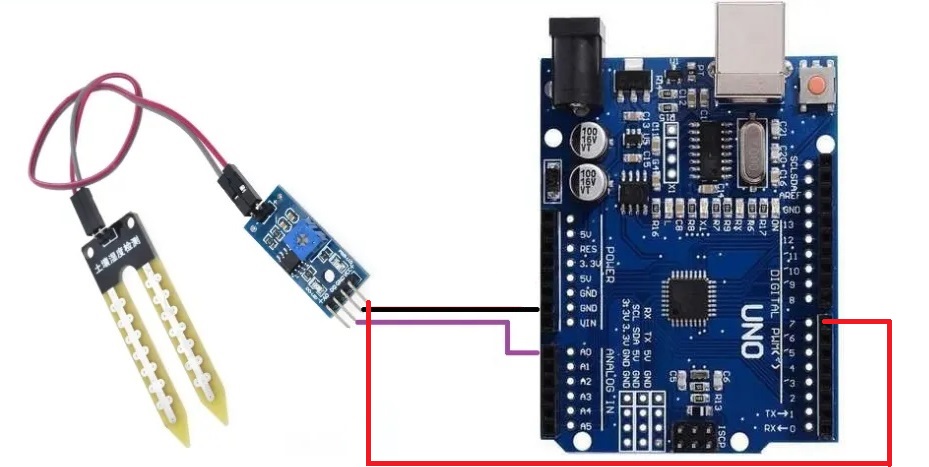
Circuit:
The module's Ground and VCC pins must be connected to the Arduino Board's Ground, and the A0 pins to pin A0 on the Arduino Board.
Library:
no library is needed.
Code:
This code turns on the sensor for only a short period of time to take a moisture reading and then turns it off to minimize corrosion. The moisture value is printed on the serial monitor every 5 seconds.
int moisture = 0;
int percentage = 0;
void setup()
{ Serial.begin(9600); // serial monitor baud rate
  pinMode(A0, INPUT); // PinMode set, pin for moisture sensor
}

void loop()
{
  moisture = analogRead(A0); // reading value
  percentage  = map(moisture, 0, 1023, 0, 100); // changing to percent
  Serial.print("Moisture= ");
  Serial.print(percentage); // Print percentage
  Serial.println("%");
  delay(1000);
}
- The first two lines declare two integer variables:
powerPinandmoisturePin.powerPinis the digital pin number to which the power pin of the moisture sensor is connected, andmoisturePinis the analog pin number to which the analog output of the moisture sensor is connected. - The
setup()function is called only once when the Arduino board is powered up. It sets thepowerPinas an output pin and turns off the sensor by setting it to LOW. It also initializes the serial communication with a baud rate of 9600. - The
loop()function is called continuously, and it contains the main code for reading and printing the moisture value. - The
digitalWrite(powerPin, HIGH)the line turns on the sensor by setting the power pin to HIGH. - The
delay(1000)line allows the sensor to stabilize for 1 second before taking the moisture reading. - The
analogRead(moisturePin)line reads the analog value of the moisture sensor and stores it in themoistureValueinteger variable. - The
digitalWrite(powerPin, LOW)line turns off the sensor to minimize corrosion by setting the power pin to LOW. - The
Serial.println(moistureValue)line prints the moisture value to the serial monitor. - The
delay(5000)line waits for 5 seconds before taking the next reading to avoid flooding the serial monitor with too many readings.
Technical Details:
- Operating voltage: 3.3V~5V.
- Panel PCB Dimension: 3cm x 1.5cm.
- Soil Probe Dimension: 6cm x 2cm.
- Cable Length: 21cm.
Resources:
Comparisons:
resistive soil sensors are less expensive but less accurate and may require frequent calibration. Capacitive soil sensors are more accurate and do not experience corrosion, but are more expensive and may require less frequent calibration here is a comparison between the two soil sensors:
Resistive Soil Sensor:
- Includes an amplifier with a Schmidt trigger circuit and 2 indicator LEDs
- May experience corrosion of the sensor probes due to DC current causing electrolysis
- Measures soil moisture content by measuring the resistance of the soil
- Less expensive than capacitive soil sensors
- Provides a rough estimate of soil moisture content
- May require frequent calibration
Capacitive Soil Sensor:
- Measures soil moisture content by measuring the dielectric constant of the soil, providing a more accurate reading than resistive sensors
- Does not experience corrosion of the sensor probes
- Can measure soil moisture content regardless of the presence of water, making it suitable for use in different soil types and environments
- More expensive than resistive soil sensors
- More accurate than resistive soil sensors
- May require less frequent calibration